A Frame Chicken Coop Plan Easy Clean
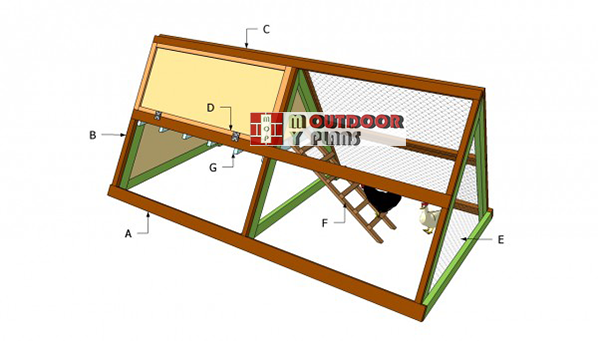
This step by step woodworking project is about a-frame chicken coop plans free. If growing chickens in free range is not an option to you, either because of the predators or because you have a small backyard, a small chicken coop is the solution to your needs. Even amateur builders can get the job done in just a weekend, if the right plans and carpentry techniques are used. Adjust the size of the chicken coop to your needs and follow the step by step instructions.
We recommend you to buy weather-resistant lumber designed for outdoor use, such as cedar, pine or pressure treated. Make sure the wooden boards are perfectly straight and in a good condition (check for twists, rot or wane). Pre-drill the lumber before inserting the screws, to protect the wood from splitting. Align the components at both ends, before securing them into place, if you want to obtain a symmetrical look. See all my Premium Plans HERE.
Projects made from these plans
[tabs tab1="Materials" tab2="Tools" tab3="Time"]
[tab id=1]
- A – 2 pieces of 2×4 lumber 120" long, 2 pieces – 117 3/4″ long BRACES
- B – 9 pieces of 2×4 lumber 60" long – cut at 60º at both ends RAFTERS
- C – 2 pieces of 2×4 lumber 117 3/4" long TOP RIDGES
- C – 1 piece of 3/4″ plywood – 48 1/2″x56″ long, 1 piece – 28 3/4″x57 3/4″ long FLOOR & BACK
- D – 2 pieces of 3/8" plywood 25×60 3/4", 4 pieces of 1×3 25", 4 pieces of 1×3 56 1/4" DOORS
- E – 40 ft of 30" wide chicken wire CHICKEN WIRE
- F – 15 fr of 2×2 lumberLADDER
- G – 6 pieces of 2×4 lumber 32 3/4" long – cut at 60º SUPPORTS
- hinges
- 100 pieces of 2 1/2″ screws
- 100 pieces of 1 1/4″ screws
- 2″ brad nails
- chicken wire
- wood glue, stain/paint
- wood filler
[/tab]
[tab id=2]
Hammer, Tape measure, Framing square
Miter saw, Drill machinery, Screwdriver, Sander
Safety Gloves, Safety Glasses
[/tab]
[tab id=3]
One weekend
[/tab]
[/tabs]
Simple chicken coop plans
Simple-chicken-coop-plans
Building an a-frame chicken coop is a straight forward project, if you use the right plans and woodworking techniques. There are many designs and shapes to choose from, but this project is about a simple structure that can be built in just an weekend.
Top Tip: Adjust the size of the chicken coop in order to fit your needs and tastes. Work with great care and judgement, making sure all the components are perfectly aligned.
A frame chicken coop plans

Building the base of the frames
Build the base for the frames out of 2×4 lumber.
Assembling-the-frames
Build the rest of the components for the frames and secure them to the base using 2 1/2″ screws. Add glue to the joints and remove the excess with a damp cloth.
Building-the-frame-of-the-coop
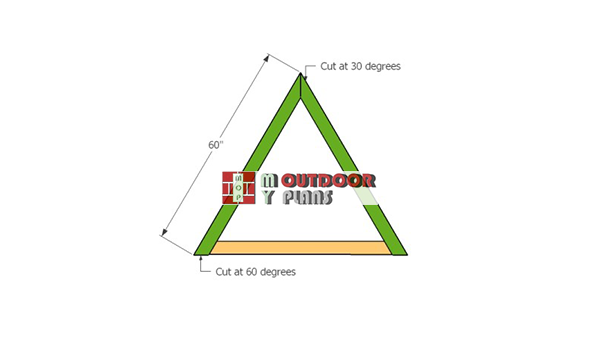
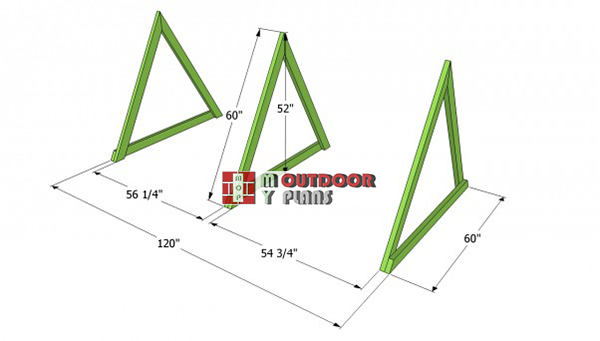
The first step of the project is to build the three A-shapes frames of the chicken coop. Therefore, cut the components from 2×4 lumber, using a good miter saw with a sharp blade. As you can see in the image, you have to cut the ends of the components at 60º, as to obtain a large structure.
Top Tip: Drill pilot holes in the lumber, before inserting the 2 1/2" wood screws, to prevent the lumber from splitting.

Building the end panel
Build the end panel from 3/4″ plywood. If you want to have an easy access to the chicken run, you can cut this panel in half horizontally and use hinges to create a door. In this manner, you can take out the chickens easily, without lifting the whole chicken coop.

Attaching the bottom end
Continue the project by securing the A frames with lateral braces. Cut several 2×4 lumber at the right size and lock them into place, after fitting the chicken coop wire. Afterwards, secure the wise to the structure with 3/4" staples, every 2" along the braces and frame.
Top Tip: Build the back of the chicken coop from 3/4 plywood and lock it into place with 2" nails. Add glue to enhance the bond of the panel to the structure.

Fitting the side supports
Make sure you align the braces properly. Check if the A-frames are plumb before attaching the braces.

A frame chicken coop handles
On the other hand, you can cut the middle braces longer, so you can use them as handles when moving the chicken coop from one location to another. 12-16″ on each side of the chicken coop is enough to create nice handles. Smooth the edges with attention.

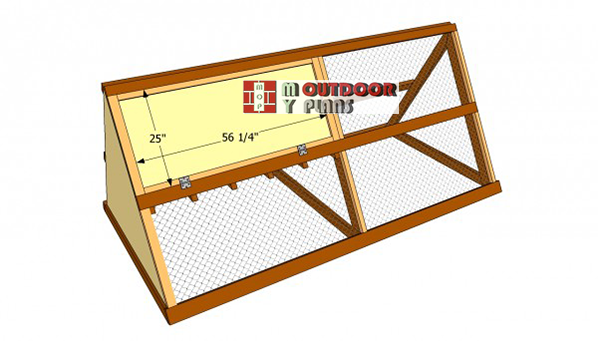
Building the upstairs room
Afterwards, build the upstairs room supports from 2×4 lumber and secure them to the side braces of the chicken coop with screws. Cut the ends of the supports at 60º, with a miter saw. Align the components at both ends, drill pilot holes and insert the 2 1/2" screws, from the exterior.
Top Tip: Cut a piece of 3/4" plywood an place it on the supports. Next, secure it tightly by driving in 1 1/4" nails into the 2×4 supports.

Installing the coop's door
After you have built the nest area, you have to make the doors of the chicken coop an install it into place. We have build doors for the nest area, but you could also add another pair on the right side, to have a better access to the rest of the sections.
Top Tip: Use 3/4" plywood to build the doors of the chicken coop, as well as 1×3 trims. Work with great care, making sure the cuts are accurate.
Installing-the-coop-door
Fit the doors into place and lock them tightly to the frame with several hinges and a simple latch. Proceed in the same manner for the rest of the doors, making sure they fit inside the openings and work properly.
Top Tip: Finish the A-shaped chicken coop by installing wire to the front end, as well as the 1×3 trims. Secure the trims into place with 2" nails, after making sure they are properly aligned.

Chicken coop ladder plans
The next step of the woodworking project is to build a small-scale ladder, to provide a better access for the chickens to the upstairs room. In order to get the job done quickly, use 2×2 lumber and 2 1/2" screws.
Cut the components with a miter saw and lay them on a level surface. Align the wooden elements properly, pre-drill the lumber and insert the wood screws. You should adjust the size of the ladder, as to fit your needs.

A frame chicken plans
Last but not lest, you have to take care of the finishing touches. Therefore, fill the holes with a good wood putty and let the compound to dry out properly. Afterwards, sand the wooden surface with medium-grit sandpaper and clean the residues with a vacuum.
Top Tip: Protect the a frame chicken coop by applying several coats of stain or paint. Attach handles to move the construction easily.
This woodworking project is abouta frame chicken coop plans. If you want to see more outdoor plans free, we recommend you to check out the rest of our step by step projects. LIKE us on Facebook to be the first that gets our latest updates and submit pictures with your DIY projects.
Source: https://myoutdoorplans.com/animals/a-frame-chicken-coop-plans/
Post a Comment for "A Frame Chicken Coop Plan Easy Clean"